
Creating a brand new Javalin web project in IntelliJ
Learn how to get started building websites with Javalin and Thymeleaf.
Tech-stack
| Technology | Version |
|---|---|
| JDK | 17 |
| Javalin | 6.1.4 |
| Thymeleaf | 3.1.3.RELEASE |
| Maven | 3.9.2 |
| IntelliJ | 2024.3.4.1 (Ultimate) |
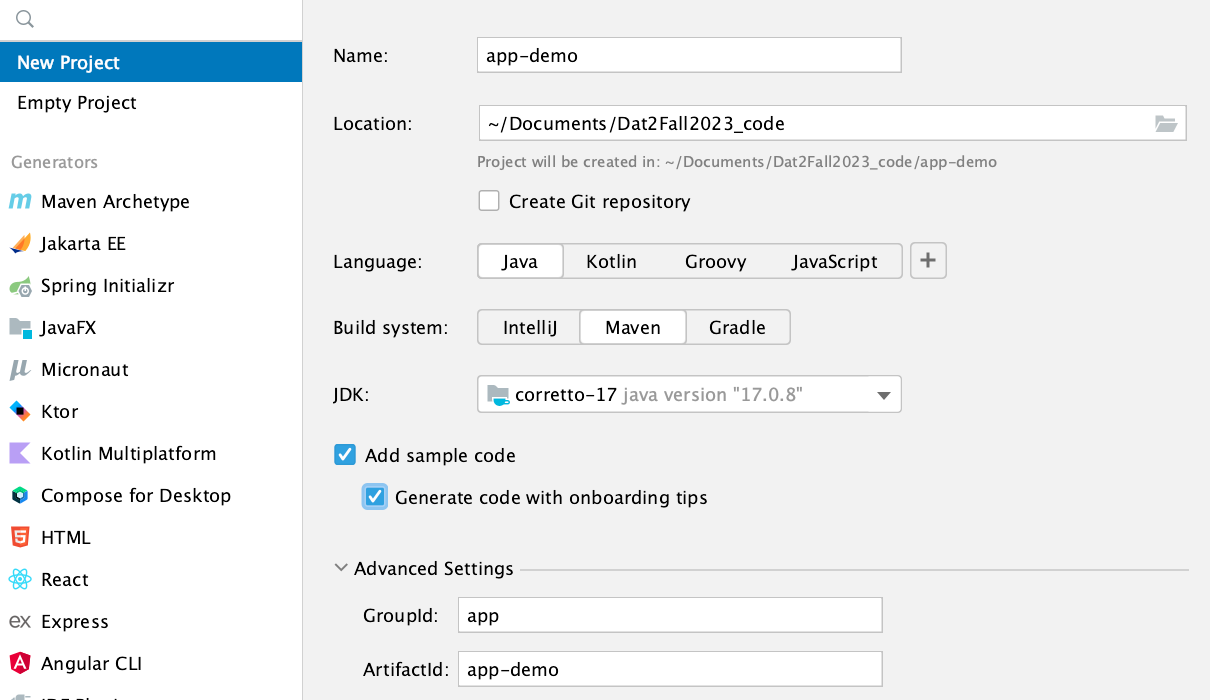
1. New project in IntelliJ
First create a brand new project in IntelliJ. Remember to add a groupId called “app” and tick the “Add sample code”.
2. Pimp the pom.xml file
We need a load of dependencies and plugins. So override your default pom.xml file with this version:
<?xml version="1.0" encoding="UTF-8"?>
<project xmlns="http://maven.apache.org/POM/4.0.0"
         xmlns:xsi="http://www.w3.org/2001/XMLSchema-instance"
         xsi:schemaLocation="http://maven.apache.org/POM/4.0.0 http://maven.apache.org/xsd/maven-4.0.0.xsd">
    <modelVersion>4.0.0</modelVersion>

    <groupId>app</groupId>
    <artifactId>myproject</artifactId>
    <version>1.0-SNAPSHOT</version>
    <packaging>jar</packaging>

    <name>${project.artifactId}</name>

    <properties>
        <maven.compiler.source>17</maven.compiler.source>
        <maven.compiler.target>17</maven.compiler.target>
        <javalin.version>6.5.0</javalin.version>
        <javalin-rendering.version>6.5.0</javalin-rendering.version>
        <thymeleaf.version>3.1.3.RELEASE</thymeleaf.version>
        <thymeleaf-extras.version>3.0.4.RELEASE</thymeleaf-extras.version>
        <slf4j.version>2.0.17</slf4j.version>
        <jackson.version>2.18.3</jackson.version>
        <hikariCP.version>6.2.1</hikariCP.version>
        <junit.version>5.12.0</junit.version>
        <hamcrest.version>3.0</hamcrest.version>
        <postgresql.version>42.7.5</postgresql.version>

        <project.build.sourceEncoding>UTF-8</project.build.sourceEncoding>
    </properties>

    <dependencies>
        <dependency>
            <groupId>io.javalin</groupId>
            <artifactId>javalin</artifactId>
            <version>${javalin.version}</version>
        </dependency>
        <dependency>
            <groupId>org.slf4j</groupId>
            <artifactId>slf4j-simple</artifactId>
            <version>${slf4j.version}</version>
        </dependency>
        <dependency>
            <groupId>io.javalin</groupId>
            <artifactId>javalin-rendering</artifactId>
            <version>${javalin-rendering.version}</version>
        </dependency>
        <dependency>
            <groupId>org.thymeleaf</groupId>
            <artifactId>thymeleaf</artifactId>
            <version>${thymeleaf.version}</version>
        </dependency>
        <dependency>
            <groupId>org.thymeleaf.extras</groupId>
            <artifactId>thymeleaf-extras-java8time</artifactId>
            <version>${thymeleaf-extras.version}</version>
        </dependency>
        <dependency>
            <groupId>com.fasterxml.jackson.core</groupId>
            <artifactId>jackson-databind</artifactId>
            <version>${jackson.version}</version>
        </dependency>
        <dependency>
            <groupId>com.zaxxer</groupId>
            <artifactId>HikariCP</artifactId>
            <version>${hikariCP.version}</version>
        </dependency>
        <dependency>
            <groupId>org.postgresql</groupId>
            <artifactId>postgresql</artifactId>
            <version>${postgresql.version}</version>
        </dependency>
        <dependency>
            <groupId>org.junit.jupiter</groupId>
            <artifactId>junit-jupiter-api</artifactId>
            <version>${junit.version}</version>
            <scope>test</scope>
        </dependency>
        <dependency>
            <groupId>org.junit.jupiter</groupId>
            <artifactId>junit-jupiter-engine</artifactId>
            <version>${junit.version}</version>
            <scope>test</scope>
        </dependency>
        <dependency>
            <groupId>org.hamcrest</groupId>
            <artifactId>hamcrest</artifactId>
            <version>${hamcrest.version}</version>
            <scope>test</scope>
        </dependency>

    </dependencies>

    <build>

        <finalName>app</finalName>

        <plugins>
            <plugin>
                <groupId>org.apache.maven.plugins</groupId>
                <artifactId>maven-compiler-plugin</artifactId>
                <version>3.10.1</version>
                <configuration>
                    <source>17</source>
                    <target>17</target>
                </configuration>
            </plugin>
            <plugin>
                <groupId>org.apache.maven.plugins</groupId>
                <artifactId>maven-shade-plugin</artifactId>
                <version>3.4.1</version>
                <configuration>
                    <transformers>
                        <transformer
                                implementation="org.apache.maven.plugins.shade.resource.ManifestResourceTransformer">
                            <mainClass>app.Main</mainClass>
                        </transformer>
                    </transformers>
                    <filters>
                        <filter>
                            <artifact>*:*</artifact>
                            <excludes>
                                <exclude>META-INF/*.SF</exclude>
                                <exclude>META-INF/*.DSA</exclude>
                                <exclude>META-INF/*.RSA</exclude>
                            </excludes>
                        </filter>
                    </filters>
                </configuration>
                <executions>
                    <execution>
                        <phase>package</phase>
                        <goals>
                            <goal>shade</goal>
                        </goals>
                    </execution>
                </executions>
            </plugin>
        </plugins>
    </build>

</project>
Yup - it’s a long one, but it will make us able to later add database connection, tests, logging, and a possibility for deployment build.
Depending on your project-name, remember to rename <artifactId>myproject</artifactId> to your liking.
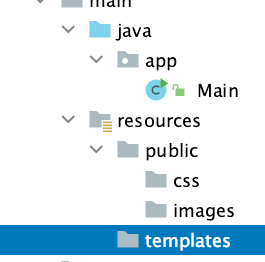
3. Add a folder-structure for the frontend files
All static files for the frontend should be located in the resources folder. To prepare ourselves, create these folders:
/resources/templates/resources/public/resources/public/css/resources/public/images
It should look like this:
4. Configure Javalin, Thymeleaf and Jetty
Javalin is a so-called micro-framework. The application will run on a Jetty webserver and servlet container, and the html pages will be rendered through the Thymeleaf template engine.
This is how to set up the parts to get started:
First, add a package called config and add these two classes into it:
package app.config;

import org.thymeleaf.TemplateEngine;
import org.thymeleaf.templateresolver.ClassLoaderTemplateResolver;

public class ThymeleafConfig
{
    public static TemplateEngine templateEngine()
    {
        TemplateEngine templateEngine = new TemplateEngine();
        ClassLoaderTemplateResolver templateResolver = new ClassLoaderTemplateResolver();
        templateResolver.setPrefix("templates/"); // assuming templates are in resources/templates/
        templateResolver.setSuffix(".html");
        templateEngine.setTemplateResolver(templateResolver);
        return templateEngine;
    }
}
package app.config;

import jakarta.servlet.SessionTrackingMode;
import org.eclipse.jetty.server.session.SessionHandler;

import java.util.EnumSet;

public class SessionConfig
{
    public static SessionHandler sessionConfig()
    {
        SessionHandler sessionHandler = new SessionHandler();
        sessionHandler.setUsingCookies(true);
        sessionHandler.setSessionTrackingModes(EnumSet.of(SessionTrackingMode.COOKIE));
        sessionHandler.setHttpOnly(true);
        return sessionHandler;
    }
}
Second, overwrite the main method in Main.class with this version:
public static void main(String[] args)
    {
        // Initializing Javalin and Jetty webserver

        Javalin app = Javalin.create(config -> {
            config.staticFiles.add("/public");
             config.jetty.modifyServletContextHandler(handler ->  handler.setSessionHandler(SessionConfig.sessionConfig()));
             config.fileRenderer(new JavalinThymeleaf(ThymeleafConfig.templateEngine()));
        }).start(7070);

        // Routing

        app.get("/", ctx ->  ctx.render("index.html"));
    }
Third, we need to add an index.html file in the resources/templates folder:
<!DOCTYPE html>
<html xmlns="http://www.w3.org/1999/xhtml" xmlns:th="http://www.thymeleaf.org">
    <title>Frontpage</title>
    <meta charset="UTF-8">
    <meta name="viewport" content="width=device-width, initial-scale=1.0">
    <link href="../public/css/styles.css" th:href="@{/css/styles.css}" rel="stylesheet"/>
</head>

<body>
    <h1>Welcome to the Javalin / Thymeleaf demo</h1>
    <p>This is your first web application in this world</p>
</body>
</html>
As the last step, we need to add this css file in the /public/css folder. Name it styles.css:
/* Stylesheet for the application */

h1 {
    color: #369;
    font-family: Arial, Helvetica, sans-serif;
    font-size: 3rem;
}
5. Build the project and fire up the Jetty server
Run the main method and watch the running local demo-website on http://localhost:7070/
Nice!
6. Feature: automatic re-build on template updates
Every time you make updates to a template file, you need to re-build the project to see the changes. But there is a way to make IntelliJ do this automatically for you.
Modify IntelliJ Compiler Settings:
- Go to IntelliJ Settings (
Cmd + ,on Mac orCtrl + Alt + Son Windows/Linux). - Navigate to Build, Execution, Deployment → Compiler.
- Enable “Build project automatically”.
- (If using IntelliJ Ultimate) Enable “Allow auto-make to start even if developed application is running”.
After this, when you save a template, IntelliJ should automatically detect changes and recompile. Notice that you might need to refresh the browser to see the changes. But you don’t need to re-build manually.