CodeLab: Test Driven Development (TDD)
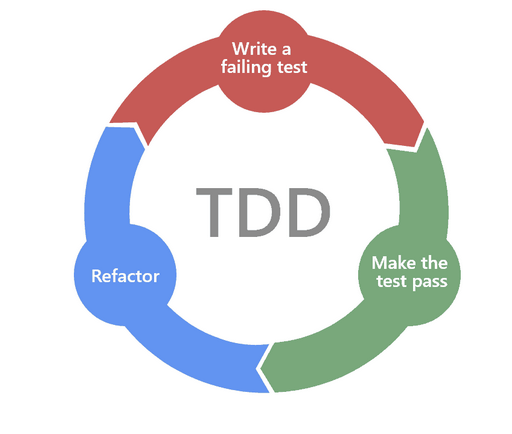
Purpose of TDD is to write tests before writing code. This is a good way to ensure that the code is testable and that the code is written in small increments and that the code is written to solve the problem with the minimal necessary code.
Test Driven Development
-
For this exercise you should pair up with another student. One of you will be the driver and the other the navigator. The driver writes the code and the navigator tells the driver what to write. The driver is not allowed to write any code unless the navigator tells him to do so. The navigator is not allowed to touch the keyboard. After each test has been written and the code has been implemented, the roles are switched. (This will train you in talking about code and explaining your thoughts and ideas to others).
- The purpose of this exercise is to train yourselfes in the art of TDD
- It is not easy to do so practise it as often as you can.
- Open up your IDE and create a new maven project:
tdd-koans - Create a test class (That’s right we start by creating the test NOT the source code)
- In the test class create a test for the first of the 8 requirements found here
- Whenever you write a new test, create the classes and methods needed for your test class to compile (Let your IDE auto create them with no implementation).
- Run the test and see that it fails.
- Implement the minimum necessary functionality in your java method, so that the test no longer fails.
- Run the test again to see that it is green.
- Refactor your code if necessary to achieve:
- Better readability and maintainability
- Elimanation of code duplication
- Better performance
- Refactoring involves making changes to the code to improve its internal structure without altering its external behavior.
- Repeat steps 3-8 for each of the 8 requirements.
- Hint for requirement 4: Use
Objecttype for the parameter andif(o instanceof String)andif(o instanceof String[])or use varargsString... valuesand check the length of the array. - Hint: Add the following section to your Pom.xml file to enable JUnit 5:
<build>
    <plugins>
        <plugin>
            <groupId>org.apache.maven.plugins</groupId>
            <artifactId>maven-surefire-plugin</artifactId>
            <version>3.0.0</version>
        </plugin>
    </plugins>
</build>
and these 2 dependencies:
<dependency>
    <groupId>org.junit.jupiter</groupId>
    <artifactId>junit-jupiter-api</artifactId>
    <version>5.10.0</version>
    <scope>test</scope>
</dependency>
<dependency>
    <groupId>org.junit.jupiter</groupId>
    <artifactId>junit-jupiter-engine</artifactId>
    <version>5.10.0</version>
    <scope>test</scope>
</dependency>
-
When you have successfully written test cases for all 8 requirements and implemented the necessary source code (same ONE method for all requirements) reflect on this exercise compared to how you have been writing code previously. Do you see any benefits in doing it this way? Do you see any down sides?
-
For more practise exercises look here